Friendship bracelets are a timeless craft, a colorful way to share a piece of yourself with someone special. Today, we’re diving into a fun and visually dynamic pattern: the Zigzag! This guide will walk you through each step to create your own eye-catching zigzag friendship bracelet. Let’s get started!
What You’ll Need:
- Embroidery floss in at least three different colors (we’ll refer to them as Color 1, Color 2, and Color 3)
- Scissors
- Safety pin or tape to secure your starting knot
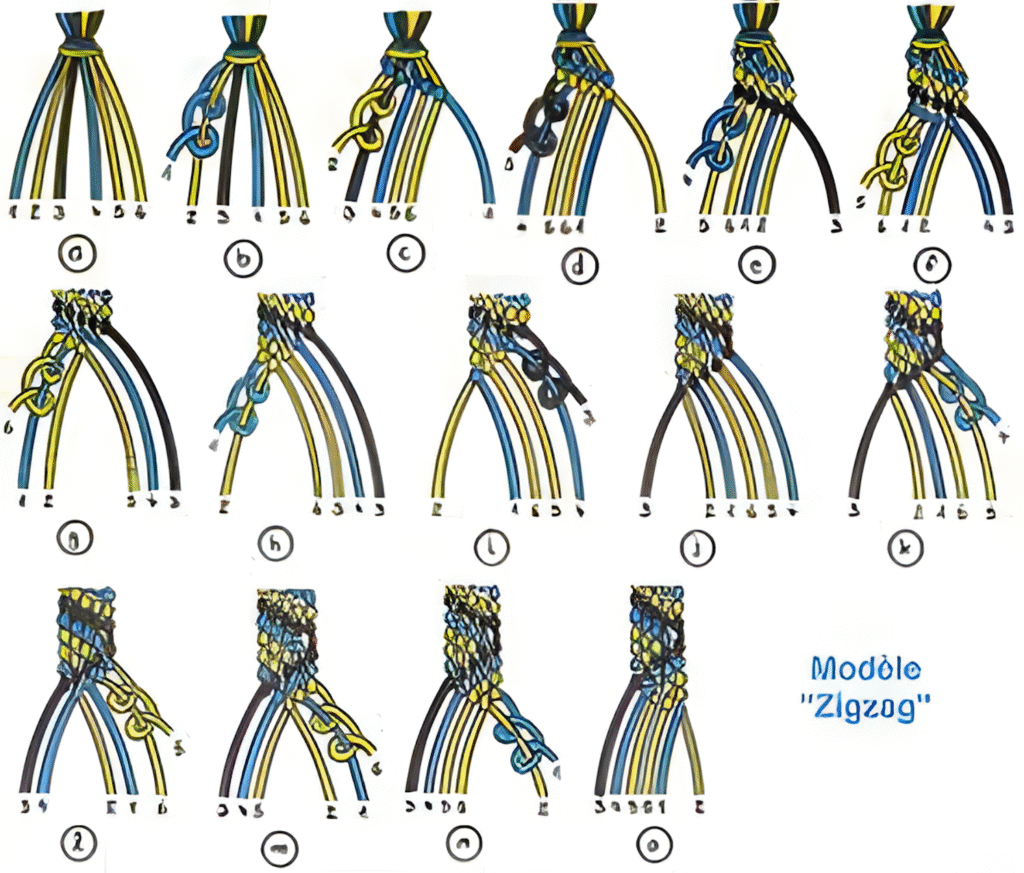
Step 1: Getting Started (Image a)
- Cut four strands of each of your chosen colors. For a standard bracelet length, aim for about an arm’s length (around 30 inches) for each strand.
- Gather all twelve strands together and tie a knot at one end, leaving a small loop at the top for easy tying later.
- Separate your strands into your desired color order. For the zigzag pattern shown, we’ll start with four strands of Color 1 on the left, followed by four strands of Color 2, and then four strands of Color 3 on the right.
- Secure the knotted end to your workspace using a safety pin or tape.
Step 2: The First Forward Knot (Image b)
- Take the first strand on the left (Color 1). This will be your knotting cord.
- Make a “4” shape over the next strand (also Color 1).
- Bring the knotting cord under the second strand and then up through the loop of the “4”.
- Pull the knotting cord to the side to tighten the knot. This is a forward knot.
- Repeat this forward knot with the same knotting cord (the first Color 1 strand) over the next Color 1 strand.
- Continue making forward knots with this same first strand across all the Color 1 strands. You will have made three forward knots.
Step 3: Continuing the Forward Knots (Image c)
- Now, take the same original first strand (Color 1) and continue making forward knots over the first Color 2 strand.
- Repeat this, making forward knots with the original first strand over all the Color 2 strands. You will have made four forward knots over the Color 2 strands.
Step 4: Completing the First Section (Image d)
- Continue with the same first Color 1 strand, making forward knots over all the Color 3 strands.
- After making four forward knots over the Color 3 strands, this first strand will now be positioned towards the right side of your bracelet. This completes the first diagonal line of your zigzag.
Step 5: Starting the Next Row (Image e)
- Now, look at the leftmost strand. It should be the second Color 1 strand from your starting arrangement. This will be your new knotting cord.
- Repeat the process of making forward knots with this new knotting cord across the remaining Color 1 strands (three knots).
Step 6: Continuing the Second Row (Image f)
- Continue making forward knots with the same new knotting cord across all the Color 2 strands (four knots).
Step 7: Finishing the Second Section (Image g)
- Finally, make forward knots with the same knotting cord across all the Color 3 strands (four knots). This strand will now also be positioned towards the right, forming the second diagonal line.
Step 8: Introducing the Second Color (Image h)
- The leftmost strand should now be the third Color 1 strand. Repeat the forward knot process across the last Color 1 strand (one knot), then all the Color 2 strands (four knots), and finally all the Color 3 strands (four knots).
Step 9: Bringing in the Final Strand of the First Color (Image i)
- The last Color 1 strand on the left will now be your knotting cord. Make forward knots across all the Color 2 strands (four knots) and then all the Color 3 strands (four knots). Now, all your Color 1 strands will be on the right side.
Step 10: Transitioning to the Second Color (Image j)
- Now, the leftmost strand should be the first Color 2 strand from your original arrangement. This will start the next zigzag line, moving back towards the left.
- This time, we will be making backward knots. A backward knot is the reverse of a forward knot. Make a backward “4” shape (the knotting cord goes over the strand to its right, forming a “4” shape).
- Bring the knotting cord under the second strand and then up through the loop of the “4” from the top.
- Pull the knotting cord to the side to tighten the knot.
- Make backward knots with this first Color 2 strand across the remaining Color 2 strands.
Step 11: Continuing the Backward Knots (Image k)
- Continue making backward knots with the same Color 2 strand across all the Color 3 strands.
Step 12: Completing the Backward Knot Section (Image l)
- Finally, make backward knots with the same Color 2 strand across all the Color 1 strands. This Color 2 strand will now be on the left side, completing a diagonal line in the opposite direction.
Step 13 and Beyond (Images m, n, o):
- Continue this process, alternating between using the leftmost strand to make forward knots moving to the right, and then using the new leftmost strand to make backward knots moving to the left.
- The color order will shift as you knot, creating the beautiful zigzag pattern.
- Remember to keep your knots consistent in tightness for a neat and even bracelet.
- Continue knotting until your bracelet reaches your desired length.
Finishing Your Bracelet:
- Once you’ve reached the desired length, tie a secure knot with all the strands.
- You can then divide the remaining strands into two equal groups and braid or twist each group.
- Tie a knot at the end of each braided section.
- Trim any excess floss.
Congratulations! You’ve created a fantastic zigzag friendship bracelet. Wear it proudly or share it with a friend to celebrate your bond. Happy knotting!

