Looking for a simple yet adorable way to create a friendship bracelet? This step-by-step guide will show you how to make a cute two-toned bracelet using basic macrame knots. It’s a perfect project for beginners and results in a lovely, wearable piece!

What You’ll Need:
- Two different colors of thin cord or embroidery floss (we’ll use yellow and pink). You’ll need one longer piece of one color (yellow in our example) and several shorter pieces of the second color (pink).
- Scissors
- A flat surface or clipboard to work on.
- Optional: Tape to secure your starting loop.
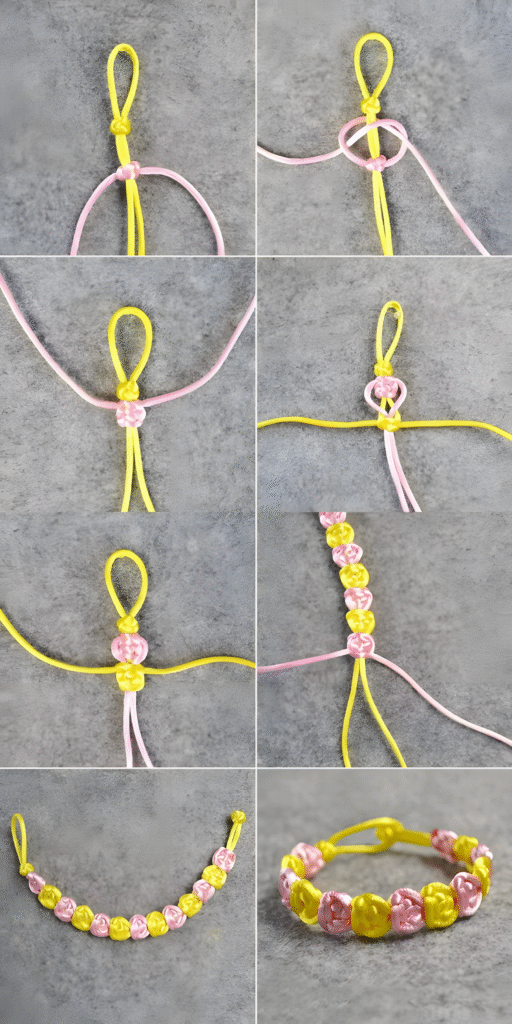
Step 1: Creating the Starting Loop (Top Left Image)
- Take your longer piece of cord (yellow). Fold one end over to create a loop. The size of the loop will determine how the bracelet closes, so make it large enough to easily pass the other end through.
- Tie a simple overhand knot at the base of the loop to secure it. This yellow cord will be the foundation and the outer edges of your bracelet.
Step 2: Attaching the First Accent Cord (Top Right Image)
- Take one of your shorter pieces of the second color (pink).
- Fold it in half to find the center, creating a loop.
- Place this pink loop under the two strands of the yellow cord, just below the knot you made in the previous step.
- Bring the two loose ends of the pink cord up and through the pink loop.
- Pull the pink ends gently to tighten the knot around the two yellow strands. This is a Lark’s Head knot (also known as a Cow Hitch knot).
Step 3: The First Set of Half Hitch Knots (Middle Left Image)
- Now, take the left pink strand. Bring it over the two yellow strands.
- Then, bring the same pink strand under the two yellow strands and up through the loop you just created.
- Pull the pink strand to tighten the knot. This is a Left-Hand Half Hitch knot.
- Repeat this Left-Hand Half Hitch knot once more with the same left pink strand over the yellow cords.
Step 4: The Second Set of Half Hitch Knots (Middle Right Image)
- Take the right pink strand. Bring it over the two yellow strands.
- Then, bring the same pink strand under the two yellow strands and up through the loop you just created.
- Pull the pink strand to tighten the knot. This is a Right-Hand Half Hitch knot.
- Repeat this Right-Hand Half Hitch knot once more with the same right pink strand over the yellow cords.
- You’ve now created your first little “bead” of pink knots wrapped around the yellow foundation.
Step 5: Adding the Next Accent Cord (Bottom Left Image – Detail)
- Take another one of your shorter pink cords.
- Fold it in half to find the center loop.
- Place this new pink loop under the two yellow strands, right below the previous pink knot.
- Bring the two loose ends of the new pink cord up and through its loop.
- Pull the pink ends gently to tighten the Lark’s Head knot around the yellow cords.
Step 6: Continuing the Pattern (Bottom Left and Top Right – Repeating Steps)
- Repeat Steps 3 and 4 with this new set of pink strands. Make two Left-Hand Half Hitch knots with the left pink strand, and then two Right-Hand Half Hitch knots with the right pink strand.
- Continue adding new pink cords using the Lark’s Head knot (Step 5) and then securing them with the double Left-Hand and Right-Hand Half Hitch knots (Steps 3 and 4).
- Keep repeating these steps, alternating colors if you wish or continuing with the same accent color, until your bracelet reaches your desired length.
Step 7: Finishing the Bracelet (Bottom Left Image)
- Once your bracelet is long enough, trim the remaining ends of the last accent cord you added. Leave a little fringe or trim close to the knots, depending on your preference.
- At the end opposite the loop, tie a knot using the two yellow strands. This knot will act as a toggle to close the bracelet by fitting through the loop you created at the beginning.
Step 8: Enjoy Your Creation! (Bottom Right Image)
Your charming two-toned friendship bracelet is now complete! Wear it with pride or share it with a friend as a symbol of your bond. Experiment with different color combinations to create a variety of unique bracelets. Happy knotting!

