Looking for a sweet and simple macrame project? This step-by-step guide will walk you through creating an adorable macrame heart charm. Perfect for keychains, pendants, or just a little decorative touch!
What You’ll Need:
- Embroidery floss or thin macrame cord in two contrasting colors (we’ll use red for the heart and green for the hanging loop). You’ll need several strands of the heart color (red) and one longer strand of the loop color (green).
- Scissors
- A flat surface or clipboard to work on.
- Optional: A bead for embellishment.
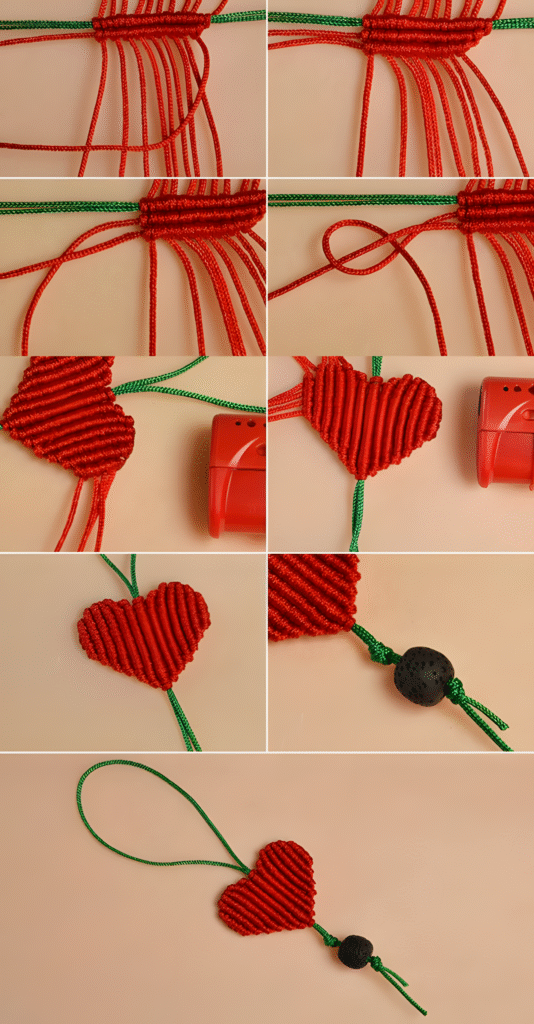
Step 1: Setting the Foundation (Top Left Image)
- Cut several strands of your heart color (red). The number and length will depend on how large you want your heart to be. For a small charm, start with about 8-10 strands, each around 12-15 inches long.
- Lay these strands horizontally.
- Take your longer strand of the loop color (green) and lay it across the center of the red strands. This will be your working cord.
Step 2: The First Row of Lark’s Head Knots (Top Left Image – Close Up)
- We’ll be using Lark’s Head knots (also known as Cow Hitch knots) to attach the red strands to the green working cord.
- Take one red strand, fold it in half, creating a loop at the top.
- Place the loop under the green working cord.
- Bring the two ends of the red strand up and through the loop.
- Pull the ends down to tighten the knot around the green cord.
- Repeat this process with all the red strands, placing them side-by-side along the green working cord. This forms your first row of knots.
Step 3: Creating the Second Row (Top Right Image)
- Now, take the two outermost red strands. These will become your knotting cords for the second row.
- We’ll be using Square Knots (or Reef Knots). To start a Square Knot:
- Take the left knotting cord and place it over the two middle strands and under the right knotting cord.
- Take the right knotting cord and bring it under the two middle strands and up through the loop created by the left knotting cord.
- Pull both knotting cords to tighten the knot.
- Now, for the second half of the Square Knot:
- Take the right knotting cord (which is now on the left) and place it over the two middle strands and under the left knotting cord.
- Take the left knotting cord and bring it under the two middle strands and up through the loop created by the right knotting cord.
- Pull both knotting cords to tighten.
- Continue making Square Knots across the row, using the adjacent pairs of red strands as your knotting cords and filler cords.
Step 4: Shaping the Heart – Initial Rows (Middle Left Image)
- Continue making rows of Square Knots. Notice how in the image, the rows are getting slightly shorter in the middle, starting to create the curve of the heart.
- To achieve this shape, in each subsequent row, you’ll leave out the outermost strand on each side. For example, if you had 8 working strands in the first row of Square Knots, you’ll only use the inner 6 for the next row.
Step 5: Refining the Curve (Middle Right Image)
- Keep creating rows of Square Knots, progressively using fewer and fewer of the inner strands. This will make the bottom of the heart start to form a point.
- Observe how the knotting cords from the previous row become the filler cords in the next.
Step 6: Forming the Top of the Heart (Bottom Left Image)
- As you continue knotting, focus on shaping the top curves of the heart. You may need to gently manipulate the knots to create the rounded lobes.
- You’ll eventually be working with just a few central strands to form the very bottom point of the heart.
Step 7: Creating the Hanging Loop (Middle Right Image – Detail)
- Once your heart shape is complete, take the two ends of the green working cord from the very top.
- Tie a knot with these two green strands to create a loop for hanging. The size of the loop is up to your preference.
Step 8: Adding a Bead (Bottom Middle Image)
- If you want to add a bead for embellishment, thread both ends of the green cord through the bead.
- Tie another knot below the bead to secure it in place.
Step 9: Finishing Touches (Bottom Image)
- Flip your heart charm over to the back.
- Carefully trim the excess red strands, leaving a small fringe if desired, or trimming close to the knots for a cleaner look.
- Trim the ends of the green hanging cord to your desired length.
Your Macrame Heart Charm is Complete!
You now have a beautiful handmade macrame heart charm! Get creative with different colors and sizes to make a collection of these sweet little tokens. They make thoughtful gifts and add a personal touch to anything they adorn. Happy knotting!

